Automatic Water Tank Level Controller: How It Works and How to Design One
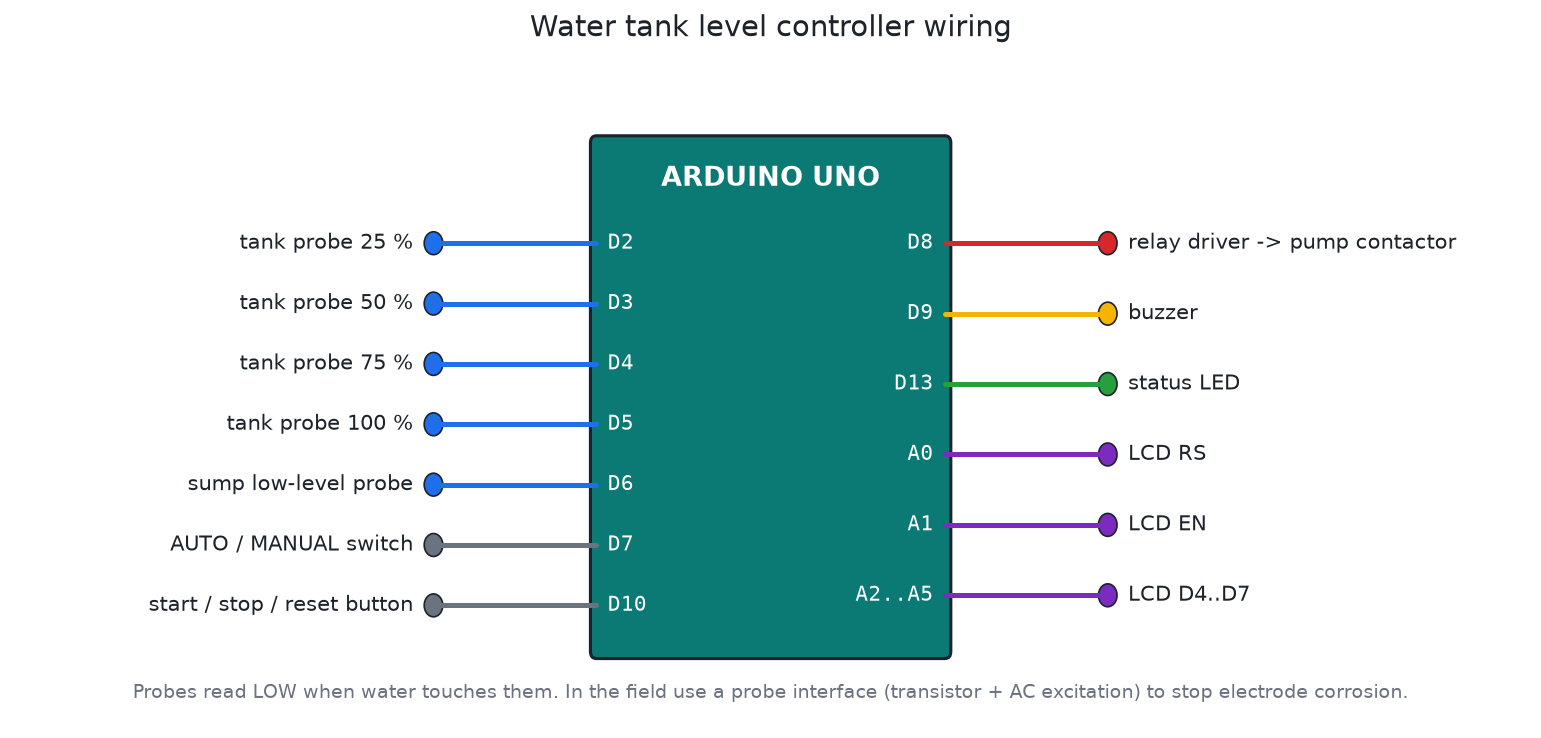
Most houses in Nepal pump water from an underground sump or a boring up to a tank on the roof. Somebody has to remember to switch the pump on, and then remember to switch it off. When they forget, the tank overflows for an hour, or the pump runs with no water and burns out.
An automatic level controller fixes both problems. A good one does more than switch the pump. It protects it.
The basic idea: two levels, not one
The simplest controller starts the pump when the tank is empty and stops it when the tank is full. If it used only one level ("pump on below 100 %"), the pump would start again as soon as someone opened a tap. It would cycle every few minutes, which wears out the motor and the contactor.
The fix is hysteresis: start at one level and stop at a higher one.
| Tank level | Pump action |
|---|---|
| Falls below 50 % | Start |
| Between 50 % and 100 % | Keep doing whatever it was doing |
| Reaches 100 % | Stop |
The gap between the two levels sets how often the pump runs. A wider gap means fewer, longer runs, which is easier on the motor.
Sensing the water
The cheapest sensor is a set of metal probes at different heights. Water conducts a little, so a microcontroller input pulled up to 5 V is pulled low when water touches the probe connected to it.
Plain probes have two problems in the field:
- Corrosion. DC current through the electrodes causes electrolysis. Stainless probes scale over within months. Use AC excitation, or power the probes only for a few milliseconds while reading them.
- Splashes and waves. Water sloshing at the inlet makes a probe flicker between wet and dry. Require each change to hold for about two seconds before acting on it.
Float switches and ultrasonic or pressure sensors avoid the corrosion problem, at a higher price.
Protection: the part that saves the pump
A pump motor fails fastest in two situations: running dry and running against a blockage. A useful controller watches for both.
Dry-run protection
A low-level probe in the sump tells the controller whether there is water to pump. If the sump runs dry, stop at once, then wait several minutes after the water returns before trying again. This gives the sump time to refill and stops the pump from chattering on and off at the edge.
No-rise protection
If the pump has run for, say, ten minutes and the tank level has not moved, something is wrong. It could be an airlock, a broken pipe or a closed valve. Stop the pump and latch a fault that needs a person to reset it. Restarting automatically would only repeat the damage.
Maximum run time
A hard limit, for example 45 minutes, catches failures nothing else detects, including a stuck probe that never reads "full".
Restart delay
Enforce at least a minute between starts. Frequent starts heat the motor windings and wear the contactor.
Sensor sanity check
The probes must make sense together. If the 75 % probe is wet while the 50 % probe is dry, a wire is probably broken. Treat that as a fault instead of guessing.
Switching the motor safely
A typical 1 HP single-phase pump draws around 5 to 7 A running and several times that while starting. A small PCB relay rated 10 A is not enough. Its contacts will pit and eventually weld closed, and a welded relay means a pump that never stops.
Use the microcontroller's relay only to drive the coil of a contactor rated for the motor, with a thermal overload relay. Keep the electronics in a sealed IP65 box away from the pump, and run probe cables in a separate conduit from mains wiring.
Showing what is happening
A 16x2 LCD showing the level, the mode (AUTO or MANUAL) and the last fault makes the system easy to trust. A manual mode is worth adding for maintenance, but the full-tank and dry-sump protections should still apply in it.
Try it in simulation first
I built this whole logic as an Arduino project with an automatic simulator test that fills and drains the tank, triggers each fault and checks the response. You can see the wiring and the full protection list on the water tank level controller project page. If you are new to simulating Arduino circuits, start with this Proteus guide.
If you need a controller designed for a building or a pumping station, get in touch.