Water tank level controller
Most houses in Nepal have the same setup: an underground sump (or a boring) and a tank on the roof. Someone has to remember to switch the pump on, and then remember to switch it off. This controller does both. More importantly, it protects the pump, because a motor running dry or against a closed valve burns out fast.
What it does
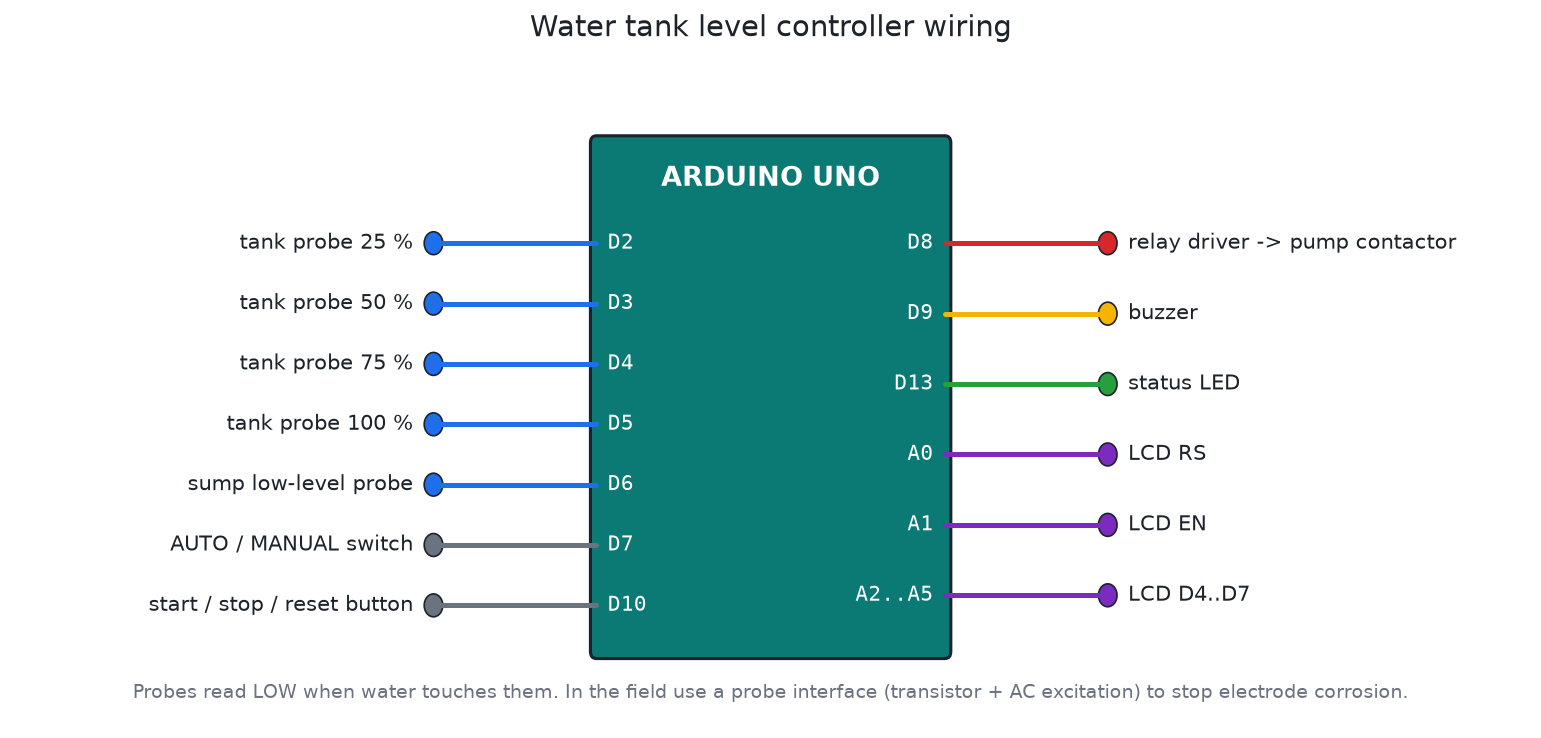
- Four probes in the roof tank (25 / 50 / 75 / 100 %) and one low-level probe in the sump.
- In AUTO it starts the pump when the tank falls below 50 % and stops at 100 %. The gap between those levels stops it cycling every few minutes.
- In MANUAL the button starts and stops the pump, but the full-tank and dry-sump protections still apply.
- A 16x2 LCD shows a level bar, the mode, and the pump run time or the fault.
Protections:
| Problem | What the controller does |
|---|---|
| Sump runs dry | Stops the pump. Waits 5 min after water returns before trying again. |
| Pump runs 10 min and the level doesn't move (airlock, broken pipe, closed valve) | Stops and latches NO RISE until someone presses the button. |
| Pump runs 45 min non-stop | Stops and latches MAX RUN TIME. |
| Impossible probe pattern (75 % wet but 50 % dry) | Stops and latches PROBE ERROR. Usually a broken probe wire. |
| Restart too soon | Waits at least 60 s between starts, to protect the motor and contactor. |
| Waves and splashes | Every probe change must hold for 2 s before it counts. |
Files
| File | What it is |
|---|---|
firmware/water_level_controller/water_level_controller.ino | Firmware |
firmware/build/water_level_controller.hex | Real-time build |
firmware/build/water_level_controller_sim_x10.hex | Long timers 10x faster, for Proteus demos |
test/sim_test.c | Automatic bench test (simavr) |
Building it in Proteus
I can't produce the .pdsprj from this machine, but the circuit only takes about 10 minutes to draw:
- New project, schematic only. Add
ARDUINO UNO(orARDUINO UNO R3),LM016L(16x2 LCD),RELAY,BUZZER,LED-GREEN+RES220R,SW-SPDT× 6 (5 probes + AUTO/MANUAL) andBUTTON× 1. - Wire it as in
images/wiring.png. Each probe is a switch from the pin to GND (closed = water). LCD: RS = A0, E = A1, D4 to D7 = A2 to A5, RW to GND, VSS to GND, VDD to +5 V. - Drive the relay coil from D8 through an NPN transistor (BC547 or 2N2222, 1k base resistor), with a diode across the coil.
- Double-click the Arduino and set Program File to
firmware/build/water_level_controller_sim_x10.hex. Set the clock to 16 MHz. - Run it. Close the probe switches bottom-up to fill the tank, then open them to drain it. Open the sump switch to see the dry-run protection.
Save it as proteus/water-level-controller.pdsprj and commit it.
Field notes
- Plain stainless probes with DC on them corrode in a few months and coat themselves in scale. Use a proper probe interface: AC excitation, or a transistor that only powers the probes while reading. Liquid-level relay modules work too, and can feed these input pins.
- Use a contactor sized for the pump (with overload relay) and drive its coil from the relay. Don't run a 1 HP pump through a 10 A PCB relay.
- Put the electronics in an IP65 box away from the pump, with the probe cables in a separate conduit from the mains.
Testing
tools/test_all.shThe test fills and drains the tank, checks the splash filter, hysteresis, dry-run stop and the 5-minute restart delay, the no-rise fault and its latch, button reset, the probe fault and manual mode.